by Chelsea Weibust

When I first started freelancing I was documenting all of my project hours in my notebook! Trust me, it took only a few weeks for me to realize that it was a terrible way to track my hours and that I needed some way to invoice my clients.
I was frustrated that I couldn't find a way online to track my hours and invoice clients for free. Since I was just starting out, I didn’t have any extra money to spend on something like accounting software so I decided to make my own spreadsheet which allowed me to track my hours and invoice my clients. The spreadsheet used simple formulas so I didn’t have to calculate my hours anymore which was essential for me.
One thing that really stressed me out was making sure I was calculating my hours correctly and also monitoring how much time I was actually spending on specific tasks for my projects to make sure I didn't blow through all my hours too quickly.
Invoicing and time tracking doesn't have to be so fancy when you're just starting out. All your client really wants to know is the number of hours your spending on a project, tasks completed, and the total cost due. Don't stress too much about the aesthetics of your invoices, spend your time on things that will make you money!
So here's the method I used for the first few months of my freelancing to both track my project hours and bill my clients.
P.S. If you want to skip all of this work, scroll down to the end! :)
Before we begin…
You can track your time and finances the free way, or the easy way.
I started out using this free method I’m about to show you but I wish I switched to a better system like Freshbooks much sooner! Using a platform that is designed for freelancers and other creatives was so much easier and made so much more sense than trying to create my own system. I found myself spending hours on accounting every month, hours that I could have spent working and getting paid. Once I realized this, I decided to switch to Freshbooks, my only regret being that I didn’t do it sooner. [Full disclosure: I’m an affiliate for Freshbooks and I recommend their product to you because I’ve gotten so much value from their software and really believe in their product, not because of the commission I get if you choose to subscribe to their software through my links.]
If you’re intrigued by using accounting software but not sure if you’re ready to go all in, you can try Freshbooks for 30 days for free without having to provide any credit card information. This was a condition that was really important for me because I wanted proof that I needed accounting software without having to fully commit to it.

If you’d rather track your time the free way, here’s the spreadsheet method I created for myself when I first started freelancing.
IF YOU TEND TO LEARN BETTER WITH PICTURES RATHER THAN VIDEOS, SEE BELOW FOR A STEP-BY-STEP TUTORIAL OF HOW TO CREATE YOUR OWN FREE TIME TRACKING/INVOICING TEMPLATE.
1. Open Google Drive
Navigate to your Google Drive account. Click the New icon and select Google Sheets. Alternatively, you can create your template using Excel.
I personally liked using Google Sheets so I could update my hours wherever I was, on any device.


2. Plug in general info
Write in general invoice information like your name, the date of the invoice, and who and what the invoice is for. Set up the time tracking portion of the table with date, time in, time out, number of hours, project number, and tasks. You may also want to add an invoice number too as well as any other relevant info for your projects.
Start adding info like Week 1 and the date at the start of the billing period.

3. Input hours
Plug in sample hours for time in and time out for the first day of the billing period.

4. Change time format
You have the option to use a 12 hour clock or 24 hour clock when entering your time. If using a 12 hour clock you’ll need to specify whether it’s AM or PM. To change the time format you can either go to format → number → more formats → more date and time formats or click the 123 drop down → more formats → more date and time formats.
From here you can select your preferred time format.


5. Block Time Formula
For me this is the best part of tracking time on a computer - formulas! This is a very simple formula for keeping track of your hours during blocks of time.
Formula: =sum(C6-B6)*24All you’re doing here is subtracting your time out from your time in and multiplying by 24 hours to get the total time worked during that duration.

6. Cell formatting
Change the cell formatting under # of Hours to Plain text under the 123 drop down menu.

7. Drag to Copy Formula
A quick and easy way to copy information, formulas, and formatting is to select the cell or cells you want to copy from and drag the box in the bottom right corner to the cells you want to copy to.
Here you can use that method to copy the block time formula to the other cells by dragging the box down to multiple cells below.

8. Select information
Select the rows with the date and time entries you just entered for the first day of the billing period.

9. Drag to copy
Now that you have the information selected, use the drag to copy method again by clicking and dragging the bottom right box down 15 rows to enter a full week of hours. This will ensure that your dates are copied sequentially and the block time formula is applied to all of the cells in the # of Hours column for the week.

10. Week total hours formula
Make a row for the weeks total hours and under the # of Hours column enter a new formula.
Formula: =sum(D6,D7,D9,D10,D12,D13,D15,D16,D18,D19)This formula calculates the sum of all the hours you entered for the week. You can start typing in the formula with “=sum(“ and then select each cell in the # of Hours column for that week while holding down CTRL or CMD.
As of late, Google Sheet unfortunately does not have a way of deselecting a cell, so if you accidentally select a cell you can just erase it from the formula.
In Excel you can hold CTRL and click on the cell again to deselect it.

Feel like using Freshbooks yet? 😉
Fun fact: I can’t actually wink irl…

11. Select top row
Select the top row of your time entries for the first day, including the Week 1 row, and CTRL+C or CMD+C to copy the information.

12. Paste information
Select the blank cell under the Week Total Hours row and CTRL+V or CMD+V to paste the copied information. Change the Week 1 text to read Week 2 and erase the Time In and Time Out hours as well as the Project # and Task information. Change the date to reflect the week 2 date in your billing period.
The # of Hours column under Week 2 should read 0. This tells us that the formula is still present in those cells.
Repeat the process of selecting the date and times for the first day of week 2.

13. Drag to copy
Repeat the process of dragging box at the bottom right corner of the selected cells down 15 cells to round out the week.

14. Check your formulas
One thing I highly recommend, especially when your copying and pasting cells with formulas, is that you check all of your formulas before you start adding information. All of these formulas build off of one another so if there’s a problem with one formula, there will be problems with all the formulas that follow. Check to make sure that they’re referencing the correct cells and that the equations are correct.

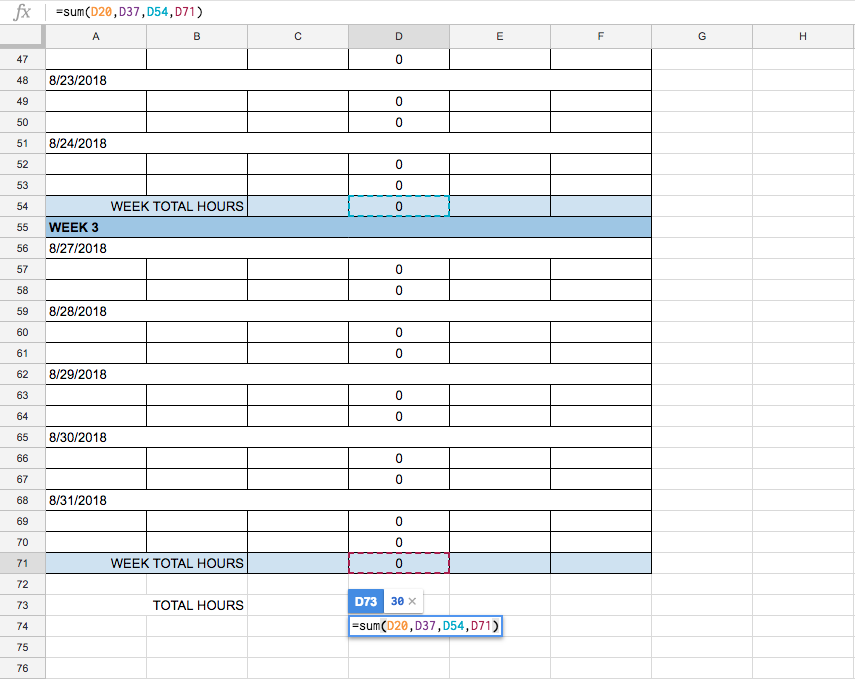
15. Total hours
Make a row at the end of your table for Total Hours worked during the billing period. Here you’ll add another formula under the # of Hours column.
Formula: =sum(D28,D37,D54,D71)What you’re doing here is adding up all of your weekly hours to get your grand total for the billing period. As always, you can simply select the cells you want to add while holding CTRL or CMD instead of typing in the cell numbers.
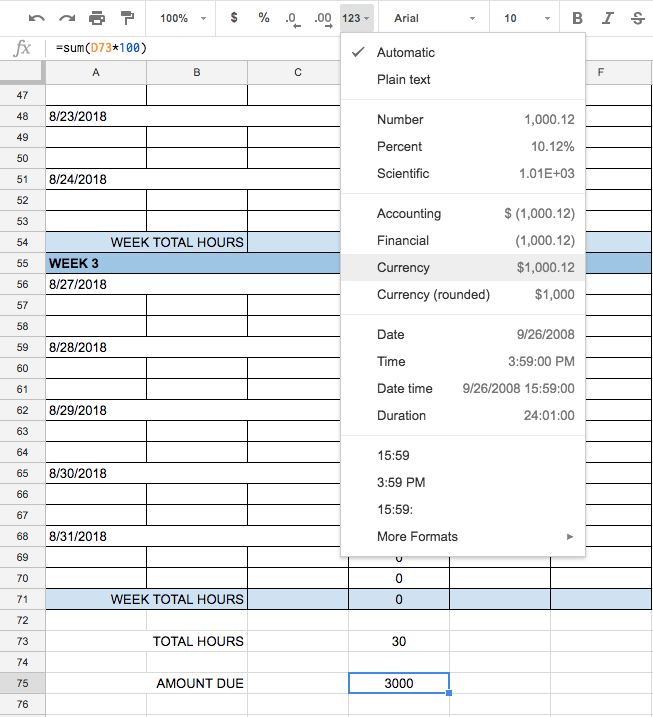
16. Amount Due
Under your Total Hours row, make a new row for the Amount Due by your client. Add another formula under the # of Hours column.
Formula: =sum(D73*100)Here you’re finding the sum of your total hours multiplied by your hourly rate.
High five if you’re making $100 an hour.

17. Change cell formatting
To ensure your amount due reads as a dollar amount, you’ll need to change the cell formatting. Go to the 123 drop down menu and choose currency.
For other currencies, go to the 123 menu → more formats → more currencies.
18. Check info
Now that you’ve reached the end, make sure to recheck all of your dates, formulas, formatting and other information.

19. Send invoice
Finally, to send your spreadsheet as an invoice to your client you can simply send them a PDF of your spreadsheet. Go to File → Download as → PDF document and send as an email.
Congrats!! You made it to the end!
If you’d like to skip all of this work, you can download a copy of the template I made here!
If you don’t have the extra cash to fork over to accounting software, stick with the free spreadsheet method. It’s a solid starting point for kicking off your freelancing career that may be all you need if you don’t mind the monotony of checking, rechecking, and changing the same information over and over. For me though, the money I was wasting (from using valuable time) by accounting on my own was far greater than the small cost of Freshbooks every month. I also had another problem where I was neglecting to track my expenses because I didn’t have a system set up to do so, but it became much less daunting once I started using Freshbooks.
If this sounds like you, give it a try! The only reason you might not want to try it is because you’ll realize how much you need it and every other method will pale in comparison!

Here are the pros and cons of tracking hours and invoicing using the spreadsheet method
Pros
It’s free
Could look very professional if you spend time on the graphics
Formulas help avoid mathematical mistakes - it’s a step up from using a notebook
Very customizable
Cons
It get’s annoying constantly modifying information for each invoice
No time tracking timer
No expense tracking
Easy to make mistakes/forget to change information
Takes time to modify the template for each invoice
Takes a lot of time to get professional looking invoices
Conclusion
The biggest benefit here is that the spreadsheet method is free. That’s a huge plus for people that don’t have the extra $15 or so a month to fork over to accounting software. The other big benefit is the full customization capabilities but it will take some valuable time to get these invoices to look great. The biggest bummer about this method is the lack of automation. Everything (apart from mathematics - thank you formulas!) has to be done manually. This means you have to spend a lot of time reentering information for the changing dates, projects, clients, time entries, tasks, etc. That’s a lot to keep track of.
The pros and cons of using accounting software
Pros
Everything is automated (no tedious updating of invoice numbers, dates, etc.)
Hours can be grouped by project and further by phases
Generate invoices from hours tracked
Hour tracking timer
Payment reminders if you have late-paying clients
Online payment options
Really great customer support (speaking from experience)
Professional looking invoices
Expense tracking
Handy graphs (for us visual folk) for things like total profit, unbilled time, revenue streams, spending, etc.
Filtered view for total project hours
Set project goals
Create proposals and estimates for projects
Cons
Costs money - see pricing
Lack of customization for invoices
Conclusion
The biggest drawback for using accounting software is that it costs money. If you think about it though, it’s about the cost of one coffee per week for the month… that’s not so bad, right? If you apply your hourly rate to the amount of time you spend on accounting every month, chances are, you’d be better off spending the money on accounting software instead and saving yourself lot’s of time and mistakes. There’s so much to gain from using accounting software beyond just simple time tracking and invoicing. You gain peace of mind that your information is correct; you gain the ability to view your accounting information graphically, cleanly, and all in one place; you can create and send professional looking invoices in seconds; and you get a platform to document your expenses on the go, among many other benefits.
Ultimately it’s up to you whether or not you want to spend extra time on modifying data over and over or if you’d rather save that time and spend the money on a tool that will benefit your business.

Comments? Questions? Feel free to leave them below!


If project inquiries have dropped off, timelines are getting pushed, or clients are suddenly tightening their budgets—you’re not alone. Economic instability has a ripple effect across the architecture world (and every other industry). But while things might be slower on the surface, this season can still be an opportunity to recalibrate, rethink, and rebuild stronger.