by Chelsea Weibust

Existing Condition Surveys
Each project is totally different, from the information available, to scope of work, to schedule, etc. It's important to know the purpose of your site visit before you head out to the site.
Sometimes when you have a site visit you'll have access to detailed existing drawings. They may be just printed drawing sets or PDF's, or ideally they'd be CAD or Revit drawings. Other times, though, you won't be given any information at all. In the latter case, it's a good idea to check out Google Maps and Tax Assessor information to get an idea of the size, shape, materiality, aesthetic, context, etc. of the building before your visit.
You may need to sketch the plans and elevations on site so be sure to bring a clipboard and graph paper for sketching and notes.
Another consideration is the scope of the project. If the project focus is strictly on interior work then you shouldn’t spend too much time documenting exterior conditions - just stick to the basics. The same is true to strictly exterior projects. If you're working on a deck renovation then documenting a ton of interior information will be a waste of time, unless of course it’s related to the project. [Full disclosure: some of the links below are affiliate links.]
Here are some tips and tricks I’ve picked up from doing existing conditions surveys.
General Survey Information:
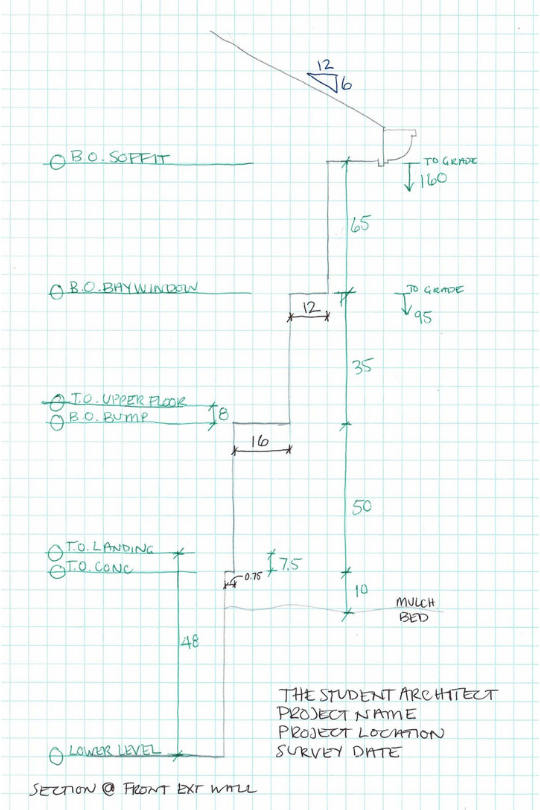
Make sure to write the date, location, and project name of the site visit on each sheet in case there's any question in the future about when the existing conditions survey was taken or what project the drawings are from. Also, write what each drawing shows, i.e. first floor plan, exterior dimensions, section through living room, etc. It may also be helpful in some cases to write the names of the people at the site visit for future reference.

Color Coding:
Sometimes existing conditions surveys will have a ridiculous amount of information and it can be tough to decipher between vertical dimensions, horizontal dimensions, opening dimensions, structural elements, etc. For this reason I like to use color and thickness variations for distinctions. For example, I like to switch between a thick black pen/marker* and a multicolored pen* to make it easy to switch between colors quickly. You can color code your notes however you like but you may want to make a legend so anyone who might look at your drawings will understand them. Here’s how I color code my surveys:
Black marker/pen: exterior walls
Black pen: horizontal dimensions, general notes, interior walls, cabinets and fixtures
Green pen: vertical dimensions (heights), spot elevations
Blue pen: window and door types, overall dimensions
Red pen: center line dimensions, mechanical elements, structural elements

Dimensions:
Write dimensions perpendicular to the dimension string in areas where you have a cluster of dimensions so you can fit all of the information.
Units:
Be consistent with how you're writing dimensions and make sure if using a laser measuring* tool that it's set to the same units you've been using. Most of the time I find it's best to write in only inches. Other times I like to write in feet and inches but when I use these units I'm careful not to use ticks for feet and inches (1' - 3 1/2") because the ticks could be mistaken for numbers. Instead, I like to keep it simple and write them like: 1 - 3.5 (0 - 4.75 if no feet) so that there's no confusion with ticks or fractions being misinterpreted.

Vertical Dimensions:
It's easy to remember to take horizontal dimensions to get wall placements and openings but something that can easily be forgotten are vertical dimensions. Ceiling heights, soffits, window sill and header heights, door heights, openings, floors, etc. can easily be overlooked until you're at your desk modeling the building.

Continue reading below

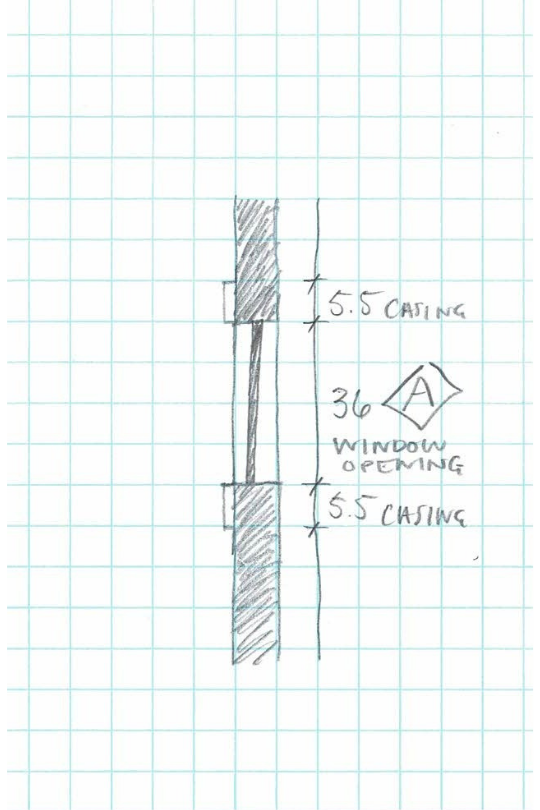
Sections, Elevations & 3D Views:
Don’t limit yourself to drawing in plan. Some information is better represented in section like roof/ceiling slopes, floor to floor heights, soffit heights, stairs, bump outs, etc. You might also find a quick 3D sketch or elevation can be helpful too.
When in doubt, draw it out!
Storyboard:
If you're short on time or are looking to get a set of dimensions that don't have to be totally accurate you can take a picture of a storyboard to get accurate enough information. To do this, hold the tape measure against whatever it is you want to dimension and take a picture of it. Try to set the camera as parallel to the tape as possible so you don't distort the image.
In the image shown you can see we wanted to quickly get the dimensions of an existing railing on a roof deck. You can see clearly the center lines of the pipes, the diameter of the pipes, and the overall height of the railing.

Topography:
Pay attention to the topography and make note of the elevation of the ground in relation to the bottom of siding material at each corner of the building, at the very least.

Material Dimensions:
Note materials and dimensions - if masonry, measure and make note of the size of the blocks used. If lap siding, shingle siding, etc. make note of the reveal and material. This will be really helpful if you need to figure out heights if you forget to measure something or just want to verify dimensions. Since reveals can vary on each course, a handy trick is to measure the height of 10 courses and divide that number by 10 to get a more accurate gauge.
You can see from the photo that 10 courses of this siding is 27 1/8” which is roughly a 2 3/4” reveal per course.

Photos:
Often one of my biggest frustrations when reviewing site visit information is not having enough photos. Anytime I'm on a site visit, I'll leave with hundreds of photos and somehow it's still not enough! There's always some wonky condition that I didn't get a great photo of or I needed a picture just 4 inches to the right. Go out of your way to take more photos than you might think you need from different angles, perspectives, and distances. Nowadays we have awesome smartphones that are capable of high quality photos, panoramas, and even videos! Videos can be especially helpful when walking through the building with an owner or consultant (with permission) so you have a record of what was discussed without having to take as many notes! I personally prefer to use my iPhone or a small point and shoot* camera that’s not too heavy and can be easily tucked away when not in use.
I once had a project where we had to survey hundreds of windows for a renovation project and most windows were totally different conditions. We needed multiple detail photos of each window. This would've been an almost impossible task to keep track of each individual window but luckily I had a Samsung Note phone with a pen so I was able to take a photo of each window, take a screenshot, and make a note on each photo which window it was. I'm not sure what we would've done otherwise but I was so thankful to have that phone at that moment! We also had a google docs spreadsheet open on my iPad to document information about the windows rather than writing it on paper so we wouldn't have to duplicate our work in transferring written notes to the computer. So in short, I guess I'm saying to make the most of your technology!
Locate Photos:
Mark interesting things on your plans that will make it easier for you or someone else to orient themselves while looking through the photos later. Maybe it's a painting on a wall, a red sweatshirt hanging on a pipe, a stain on the ceiling, etc. but it should be something distinct that will help place tricky conditions in photos on the plans. If you're taking detail photos, remember to step back and take context photos so you can locate them later.
The photo below shows a steel rod tied to the roof rafters which was holding up the 2nd floor of a old home. This was both fascinating and terrifying (since the house needed significant repair) but we needed to be sure to mark the locations of these rods on the plans. This picture is great to see the detail of how the tensile system works but doesn’t help at all in telling us where this rod is located. So on the floor plan I made a note on the plan with a star and a cone (<) showing the direction of the photo, saying something like “steel rod tied to roof structure, tension wheel” and this was really helpful because none of the other pictures of the rods showed the wheel or tensile system and now we knew exactly where it was and what direction we were looking.
Locating pictures on plans is really only necessary in tricky areas like basements, attics, eaves, or in monotonous buildings where a lot of spaces look exactly the alike, so try not to go overboard with this.

BONUS: Tips for You

Backpack:
I recommend carrying a small bag with you while on site visits to hold extra tools and whatever else you may have. I suggest using a small backpack* rather than something like a messenger bag since it wont get in the way.

Snacks:
Maybe I'm the only one who thinks about food constantly, but I always find it's a good idea to keep a couple snacks with me on a site visit. Sometimes things take longer than expected and you don't want to be famished, trying to rush through your survey so you can get a bite to eat. It can't hurt to throw a couple granola bars and a water in your bag, right?

Dress Appropriately:
If it's the middle of winter and you're surveying a building without heat, you're going to want to dress in lot's of warm layers. Be sure to check the weather beforehand so you know if it's supposed to rain (and will need rain gear and umbrella), if it's going to be brutally cold (and need hats, gloves, scarves, lots of layers, etc.), if it's going to be windy (and you need a windbreaker and extra clips to attach papers to your clipboard)... you get the idea

Shoes:
Two things you need to consider about footwear are safety and comfort. You should never wear open toed shoes or high heels to a site visit, there are just too many things that could go wrong. You're probably going to be walking around for hours, sometimes crawling around in icky places, and potentially walking on unstable surfaces or trekking through the mud. Opt for comfortable sneakers or boots.
Happy measuring!
- Chelsea

More posts you might like:


Thinking of leaving the structured world of an architecture firm to go solo? The transition from employee to business owner is a big shift—personally and professionally. Here are five major changes you’ll experience (and grow from!) when you trade firm life for freelancing or running your own design studio—plus tools to help you thrive along the way.